Jetson Generative AI – ComfyUI and Flux

Requirements
|
Hardware / Software
|
Notes
|
|---|---|
|
Jetson AGX Orin
|
64GB recommended for optimal performance
|
|
JetPack 6.0+
|
Needed for CUDA 12.4 support
|
|
~30 GB free storage
|
For models and generated images
|
Obtaining Model Access
Obtaining Model Access
Step-by-Step Setup
Step-by-Step Setup
1. Install Miniconda
1. Install Miniconda
2. Create Python environment
2. Create Python environment
3. Install CUDA 12.4
3. Install CUDA 12.4
4. Configure CUDA environment
4. Configure CUDA environment
5. Compile bitsandbytes
5. Compile bitsandbytes
6. Install PyTorch for Jetson
6. Install PyTorch for Jetson
7. Install ComfyUI
7. Install ComfyUI
8. Launch ComfyUI
8. Launch ComfyUI
9. Open the Web UI
9. Open the Web UI
Starting serverTo see the GUI go to: http://127.0.0.1:8188
http://<jetson-ip>:8188
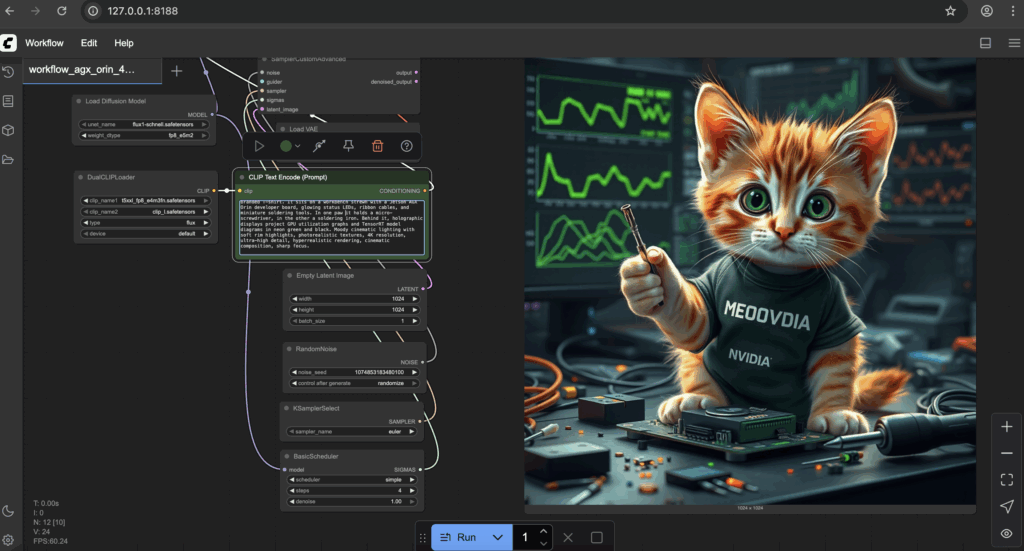
ComfyUI Flux Workflow
10. Download Flux models
10. Download Flux models
11. Download and load workflow
11. Download and load workflow
Troubleshooting
How to Fix the “conda activate is not working” Error ?
If you encounter issues where the conda activate command does not work in your terminal, it’s usually because the Conda shell integration hasn’t been set up properly. To fix this, run the following commands:
These commands initialize Conda for your shell, enabling the conda activate command to work correctly in new terminal sessions. After running them, restart your terminal or source your shell configuration file.
How to Fix bitsandbytes Compilation Errors
If you encounter compilation errors while installing or building bitsandbytes, it’s often due to missing essential build tools and dependencies. To resolve this, install the required packages using:
These packages provide the necessary compilers, build systems, and configuration tools to successfully compile bitsandbytes on your system.
How to Fix Slow Installation of Safetensors ?
If you experience very slow downloads or installations of large .safetensors files, it might be due to inefficient download methods. To speed up the process, follow these steps:
Install Git Large File Storage (LFS) by running:
Use a multi-connection download accelerator like aria2 to download the file faster:
Troubleshooting
|
Issue
|
Fix |
|---|---|
|
Out of memory errors
|
Use `python main.py –lowvram` or close other applications
|
|
Model loading errors
|
Verify all `.safetensors` files downloaded completely
|
|
Slow generation
|
Enable max performance: `sudo jetson_clocks && sudo nvpmodel -m 0`
|
|
CUDA not detected
|
Check `nvcc –version`
|